Cave Engine NavMesh
A downloadable tool
NavMesh Recast Bake Plugin
User Manual for Cave Engine
Version 0.1 - Updated November 2024
Table of Contents
- Introduction
- Installation
- Important Notes
- Getting Started
- Plugin Overview
- Parameter Reference
- Usage Example
- Recommended Workflow
- Troubleshooting
1. Introduction
The NavMesh Recast Bake Plugin is a powerful editor tool for Cave Engine that allows you to generate navigation meshes for AI pathfinding. It uses the industry-standard PyRecastDetour library (based on Recast Navigation) to create high-quality navigation data from your level geometry.
A Navigation Mesh (NavMesh) is a simplified representation of walkable surfaces in your game level. AI agents use it to find optimal paths while avoiding obstacles and respecting constraints like maximum slope or climb height.
Note : Terrain are not supported.
Note 2 : I use a fork of Tugcga/PyRecastDetour-Sources.
2. Installation
Step 1: Install PyRecastDetour & python Library
The PyRecastDetour library must be installed in Cave Engine's Libs directory.
Currently, the pre-built library files are available for Windows only.
Also, you need many default library from Python 3.7.4, so you need to download ;
https://www.python.org/ftp/python/3.7.4/Python-3.7.4.tgz
2 Copy Library Files to Cave Engine
Copy the entire PyRecastDetour & Pythons-3.7.4\Lib (do not remplace the existing files) folder to your Cave Engine installation:
CaveEngine/
└── Libs/  ← Place Lib/ from Python contents here
    └── recastdetour/          ← Place recastdetour/ contents here
        ├── __init__.py
        ├── Py310RecastDetour.*.pyd  (or .so on Linux)
        └── README.md
3 Copy Package Files to Cave Engine
Copy the file NavMeshRecastBakePlugin##1765208428.cavePkg to your Cave Engine installation:
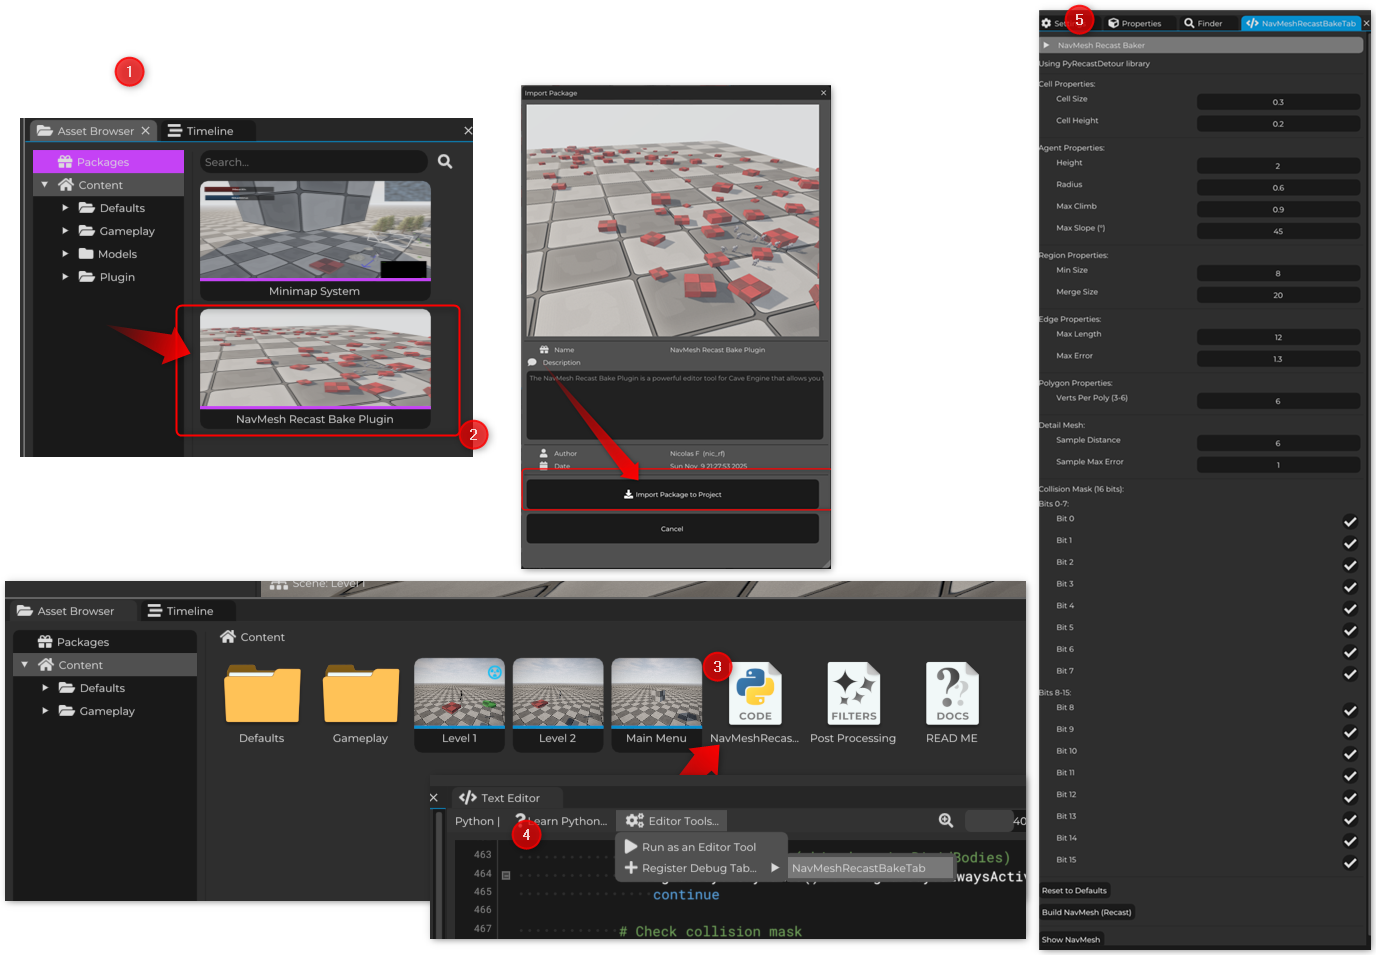
Step 2: Register the Plugin in Cave Engine
The plugin won't appear in the editor until you register it!
Locate the plugin script:
Source/Content/NavMesh/NavMeshRecastBakePlugin (1234).py
In the Cave Engine editor, select the script :
- Go to Text Editor Tools menu
- Select Register Debug Tab
- Choose the
NavMeshRecastBakePluginfile
- The plugin tab should now appear in the editor interface
3. Important Notes
File Storage Location
All generated NavMesh files are saved in:
YourProject/
└── Source/
    └── NavMesh/
        ├── SceneName_SceneUID_recast_navmesh.bin
        └── SceneName_SceneUID_recast_options.json
Files are named using both the scene name and scene UID to ensure each scene has unique NavMesh data. This prevents conflicts when you have multiple levels.
What Gets Saved
- .bin file: The compiled navigation mesh (binary format)
- _options.json: Your bake settings for future reference/reuse
4. Getting Started
Quick Start Guide
Ensure your level has static geometry with RigidBodyComponent set to non-dynamic (isDynamic = false).
Find the NavMesh Recast Baker tab in the editor.
Adjust parameters based on your agent's size and movement capabilities (or use defaults).
Click "Build NavMesh (Recast)" button and wait for completion.
Click "Show NavMesh" to see the generated navigation mesh in the editor viewport.
5. Plugin Overview
User Interface
The plugin interface is organized into several sections:
| Section | Purpose |
|---|---|
| Cell Properties | Control voxelization resolution |
| Agent Properties | Define AI agent size and movement capabilities |
| Region Properties | Control how NavMesh regions are generated and merged |
| Edge Properties | Control edge simplification |
| Polygon Properties | Define polygon complexity |
| Detail Mesh | Fine-tune detail mesh generation |
| Collision Mask | Choose which collision layers to include |
| Actions | Build, reset, show/hide NavMesh |
| Statistics | View build results |
6. Parameter Reference
Cell Properties
| Parameter | Default | Description |
|---|---|---|
| Cell Size | 0.3 | Horizontal voxel size. Smaller = more detailed but slower. Recommended: agent_radius / 2 |
| Cell Height | 0.2 | Vertical voxel size. Recommended: agent_height / 4 |
Agent Properties
| Parameter | Default | Description |
|---|---|---|
| Height | 2.0 | Minimum ceiling height the agent needs to pass through |
| Radius | 0.6 | Agent's collision radius (how wide is the agent) |
| Max Climb | 0.9 | Maximum ledge height the agent can climb (e.g., stairs) |
| Max Slope (°) | 45.0 | Maximum walkable slope angle in degrees |
Region Properties
| Parameter | Default | Description |
|---|---|---|
| Min Size | 8 | Minimum region size in voxels. Smaller regions are removed |
| Merge Size | 20 | Regions smaller than this are merged with neighbors |
Edge Properties
| Parameter | Default | Description |
|---|---|---|
| Max Length | 12.0 | Maximum edge length before subdivision |
| Max Error | 1.3 | Maximum distance from original geometry during edge simplification |
Polygon Properties
| Parameter | Default | Description |
|---|---|---|
| Verts Per Poly | 6 | Maximum vertices per polygon (3-6). Higher = more complex shapes allowed |
Detail Mesh
| Parameter | Default | Description |
|---|---|---|
| Sample Distance | 6.0 | Detail mesh sampling distance. Lower = more detail |
| Sample Max Error | 1.0 | Maximum error in detail mesh heightfield sampling |
Collision Mask
Select which collision layer bits to include in NavMesh generation. Enable bits that correspond to your static level geometry.
7. Usage Example
Here's a complete example showing how to use the NavMesh at runtime with the NavMeshSystemRecast component.
Step 1: Bake the NavMesh (Editor-Time)
- Open your scene in Cave Engine Editor
- Open the NavMesh Recast Baker plugin tab
- Adjust settings for your agent (e.g., agent radius 0.6, height 2.0)
- Click "Build NavMesh (Recast)"
- Wait for the build to complete (check console for progress)
- Click "Show NavMesh" to verify the result
You should see cyan-colored polygon edges representing the walkable areas in your level.
Step 2: Create an AI Agent Entity
- Create a new entity in your scene (e.g., "AI Agent")
- Add a Transform component
- Add a Character component (for physics-based movement)
- Add a Mesh component (for visualization)
- Add the NavMeshSystem component from:
NavMeshSystemRecast.py
Step 3: Configure NavMeshSystem Component
Set the following properties on the NavMeshSystem component:
# Enable automatic target following
followTarget = True
# Target entity name (the AI will follow this entity)
targetEntityName = "Player"
# Create target entity if it doesn't exist
createTargetEntity = False
# Movement speed
moveSpeed = 3.0
# Stopping distance from target
stoppingDistance = 1.0
# Path recalculation distance (recalculate when target moves this far)
pathRecalculateDistance = 2.0
# Stuck detection time (seconds)
stuckDetectionTime = 1.0
#
When you run the game:
- The NavMeshSystem component loads the baked NavMesh file
- It finds the target entity (e.g., Player)
- It calculates a path from the AI agent to the target
- The agent follows the path using the Character component
- The path automatically updates when the target moves
Example Python Code
Here's the runtime code structure (from NavMeshSystemRecast):
import cave
import os
class NavMeshSystem(cave.Component):
    # Properties
    followTarget = False
    targetEntityName = "Player"
    moveSpeed = 3.0
    stoppingDistance = 1.0
    def start(self, scene):
        # Load the PyRecastDetour library
        import recastdetour as rd
        self.navmesh = rd.Navmesh()
        # Load the baked navmesh file
        sceneName = scene.name
        sceneUID = scene.getUID()
        navmeshPath = cave.getGamePath(
            f"Source/NavMesh/{sceneName}_{sceneUID}_recast_navmesh.bin"
        )
        if os.path.exists(navmeshPath):
            self.navmesh.load_navmesh(navmeshPath)
            print(f"Loaded NavMesh for scene '{sceneName}'")
        else:
            print(f"ERROR: NavMesh file not found!")
            self.navmesh = None
        # Initialize references
        self.character = self.entity.get("Character")
        self.targetEntity = scene.get(self.targetEntityName)
        self.currentPath = []
    def update(self):
        if not self.followTarget or not self.targetEntity:
            return
        currentPos = self.entity.getTransform().getWorldPosition()
        targetPos = self.targetEntity.getTransform().getWorldPosition()
        # Find path using PyRecastDetour
        self.currentPath = self.findPath(currentPos, targetPos)
        # Follow the path
        if self.currentPath:
            waypoint = self.currentPath[0]
            direction = (waypoint - currentPos).normalized()
            self.character.setWalkDirection(
                direction * self.moveSpeed,
                local=False
            )
    def findPath(self, start, end):
        if not self.navmesh:
            return []
        # Convert Cave Vector3 to tuples
        startTuple = (start.x, start.y, start.z)
        endTuple = (end.x, end.y, end.z)
        # Use PyRecastDetour pathfinding
        path = self.navmesh.pathfind_straight(startTuple, endTuple)
        # Convert back to Vector3 list
        waypoints = []
        for i in range(0, len(path), 3):
            waypoints.append(
                cave.Vector3(path[i], path[i+1], path[i+2])
            )
        return waypoints
8. Recommended Workflow
For Best Results
Create level geometry with clear walkable surfaces and proper collision setup.
Ensure all static level geometry has RigidBodyComponent with isDynamic = False.
Organize geometry using collision bits (0-15) and configure the Collision Mask in the plugin to include only relevant layers.
Set agent height, radius, max climb, and max slope based on your game's character controller.
Click "Build NavMesh (Recast)" and review the console log for any warnings.
Use "Show NavMesh" to inspect the result. Check that all intended walkable areas are covered.
Adjust parameters and rebuild if needed. Settings are auto-saved to JSON for easy tweaking.
Add NavMeshSystem components to your AI entities and test in-game.
Tips for Optimization
- Start with larger cell sizes for faster iteration, then reduce for final quality
- Use appropriate agent radius - too small = tight spaces, too large = limited navigation
- Limit collision mask bits - only include truly static geometry
- Save settings to JSON - the plugin auto-saves your settings for each scene
- Check Statistics - monitor polygon count and file size to gauge complexity
9. Troubleshooting
Common Issues and Solutions
Solution: Install the library in
CaveEngine/Libs/recastdetour/ as described in Section 2.
Solution: Ensure your scene has entities with:
RigidBodyComponentwithisDynamic = FalseMeshcomponent with valid geometry- Collision group matching your selected Collision Mask bits
Solution: Register the plugin via Editor Tools → Register Debug Tab
Solution:
- Reduce Cell Size for better resolution
- Check Max Slope - area might be too steep
- Verify geometry has proper collision setup
- Check Region Min Size - small islands might be filtered out
Solution:
- Increase Agent Radius to keep AI away from walls
- Check Max Climb matches your Character component settings
- Enable showDebugPath in NavMeshSystem to visualize the calculated path
- Verify stuckDetectionTime is appropriate (try 1.0-2.0 seconds)
Solution:
- Increase Cell Size (try 0.5 or higher)
- Increase Cell Height
- Reduce scene complexity or use Collision Mask to exclude unnecessary geometry
- Use simpler polygon settings (reduce Verts Per Poly)
Getting Help
If you encounter issues not covered here:
- Check the console log - the plugin outputs detailed messages during the build process
- Review the Statistics - check vertex/polygon counts to ensure the build succeeded
Appendix: File Locations Quick Reference
| Item | Location |
|---|---|
| Bake Plugin | Source/Content/Recast/NavMeshRecastBakePlugin (1765208428).py |
| Runtime System | Source/Content/Recast/NavMeshSystemRecast (1786176502).py |
| PyRecastDetour Library | CaveEngine/Libs/recasdDetour/ |
| Generated NavMesh Files | Source/NavMesh/{SceneName}_{UID}_recast_navmesh.bin |
| Saved Settings | Source/NavMesh/{SceneName}_{UID}_recast_options.json |
NavMesh Recast Bake Plugin for Cave Engine
Built with PyRecastDetour • Powered by Recast Navigation
Happy Pathfinding!
Download
Click download now to get access to the following files:


Comments
Log in with itch.io to leave a comment.
This plugin is amazing, I’m already using it in my project, thank you so much for developing it!